How to Use TimThumb to Automatically Resize WordPress Post Images Part 3: Changing Folder Permissions

Step 2: Change Folder Permissions – IMPORTANT!
This is the step that causes the most issues for TimThumb users. In fact, it’s pushed many people into giving up on the plugin all together – I almost followed in their footsteps. Fortunately, I figured it out (about an hour later) and will explain to you how I got everything working!
Every folder and file on your web server is assigned a “Permission” code. That code tells the server how protected that file/folder should be. Since TimThumb creates a cache of every image we use with it, we must ensure that our folders/files have adequate permissions to allow the plugin to work.
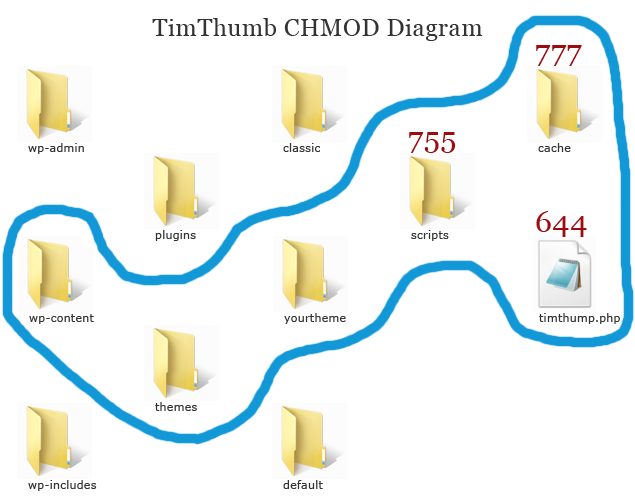
We will change the permissions of four folders/files. Changing permissions is referred to as “CHMODding” or the “CHMOD command.” To change permissions within Filezilla, simply right-click the file/folder and choose “File Permissions.” Enter the values below into the “Numeric Value” field.
- Change the permission of the “scripts” folder to 755
- Change the permission of the timthumb.php file to 644
- Change the permission of the “cache” folder to 777
- Change the permission of your image folder to 777 – Only needed if you use a custom folder to upload your images. If you use the WordPress “Add Image” option, ignore this step.
See the diagram below for visual instruction:

TimThumb CHMOD Diagram
I Can’t Change the Permissions!
No problem – if you’re unable to change the permissions, this means your web host does not allow you to. Simply contact them and let them know you need the permissions for these files/folders changed.
Now we need to add our images. Let’s move on to part 4.
You’re Viewing a Post Series!
This post is only one part of our discussion. Check out the other parts below:
- How to Use TimThumb to Automatically Resize WordPress Post Images Part 6: Styling Image with CSS
- How to Use TimThumb to Automatically Resize WordPress Post Images Part 5: Integrating TimThumb with WordPress Theme
- How to Use TimThumb to Automatically Resize WordPress Post Images Part 4: Adding Image to Post Using Custom Fields
- How to Use TimThumb to Automatically Resize WordPress Post Images Part 3: Changing Folder Permissions
- How to Use TimThumb to Automatically Resize WordPress Post Images Part 2: Installing TimThumb
- How to Use TimThumb to Automatically Resize WordPress Post Images Part 1: Introduction
Topic Tags:
blog design, filezilla, images, php, timthumb, tutorial, wordpress


 I’m Keller Hawthorne, Founder of FresheVenture.com. Whether you’re new to the world of Internet Marketing or already have your own Internet Business, I’m here to help you make a living online!
 Subscribe to My RSS Feed!