How to Use TimThumb to Automatically Resize WordPress Post Images Part 4: Adding Image to Post Using Custom Fields

Step 3: Add Image to Post Using Custom Fields
Ever noticed that “Custom Fields” box on the “Edit Post” page in WordPress? Don’t be scared of that area! The “Custom Fields” box is a powerful and easy way to add special features to posts, such as podcasts and images. If you haven’t touched it yet, let me explain how it works.

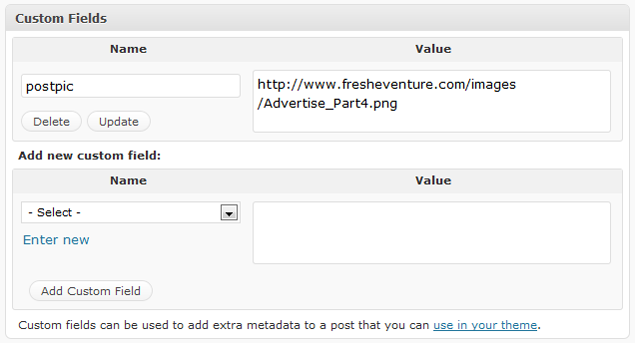
WordPress Custom Fields Box
This box allows us to add special data to posts which we can play with later in our theme. As you can see above, I’ve used it to add an image to this post. The image is no longer embedded within the post content, but instead “attached to it” as meta data.
Name Field:
Think of the name field as an ID section for the data you want to insert. You’re simply assigning this data an ID or “Name” with which you can use to identify it later within your theme template pages.
Value Field:
This section is where we insert our data. In this case, I’ve inserted the URL of the image I would like to use in this post. You can see that I store my images in a folder called “images,” however this is not necessary. You could continue to use the WP “Add Image” button or your “Media” section to upload images to your blog and then use the URL WP provides you and insert it into the “Value” field.
How Does TimThumb.php Work with Custom Fields?
When using TimThumb, we add specific PHP code to our WordPress theme that looks for data from the custom fields section of a post. If it finds the data with the “Name” we’ve selected, it will do whatever it is we want it to do with that data.
So, we need to add an image to this post! For this section, I will assume you’re using the built in WordPress image upload-er.
A. Upload Image to WordPress
- Go to Posts > Edit
- Edit a post you would like to work with for this tutorial or add a new one
- While in the “Edit Post” page, click the “Add an Image” button
- Under the “From Computer” section, click “Select Files”
- Locate the image you would like to upload on your computer and click “Open”
- You should now see your image. Click on the button that says “File URL.” WordPress will now display the URL for this image
- Highlight and copy the image URL
- Click “Save All Changes” and close the box
B. Insert Image Into Custom Fields
We need to add our image to the Custom Fields box. First, we need to assign this data a “Name.” This same name will be used on every post we want TimThumb to resize images for.
- Click the “Enter New” link in the Custom Fields box
- *Enter a name (many TimThumb users like to use the name “thumb”)
- Paste the URL of your image into the “Value” field
- Click “Add Custom Field”
- Save your post
- How to Use TimThumb to Automatically Resize WordPress Post Images Part 6: Styling Image with CSS
- How to Use TimThumb to Automatically Resize WordPress Post Images Part 5: Integrating TimThumb with WordPress Theme
- How to Use TimThumb to Automatically Resize WordPress Post Images Part 4: Adding Image to Post Using Custom Fields
- How to Use TimThumb to Automatically Resize WordPress Post Images Part 3: Changing Folder Permissions
- How to Use TimThumb to Automatically Resize WordPress Post Images Part 2: Installing TimThumb
- How to Use TimThumb to Automatically Resize WordPress Post Images Part 1: Introduction
*If your theme already uses TimThumb, find out what Custom Field “Name” your theme developer assigned and use that.
Fantastic! Our post image is now ready to be manipulated by TimThumb. Let’s move on to part 5.
You’re Viewing a Post Series!
This post is only one part of our discussion. Check out the other parts below:
Topic Tags:
blog design, filezilla, images, php, timthumb, tutorial, wordpress


 I’m Keller Hawthorne, Founder of FresheVenture.com. Whether you’re new to the world of Internet Marketing or already have your own Internet Business, I’m here to help you make a living online!
 Subscribe to My RSS Feed!